.png?width=300&height=58&name=Demo%20Account%20Logos%20(560%20x%20102%20px).png)
Platform: Both (Web Application and Mobile App)
User Type: Org Admin / Admin
Difficulty: Intermediate
Estimated Time: 15 minutes
Last Updated: September 2025
Quick Summary
Learn the differences between Simple and Advanced labour tracking methods in Dayworkbook, configure labour positions and individual workers, and choose the approach that best suits your organisation's documentation and productivity requirements.
What You'll Learn
- Understand when to use Simple vs Advanced labour tracking
- Set up labour positions for consistent daywork documentation
- Configure individual workers within positions for detailed tracking
- Manage standard and overtime rates for accurate billing
- Switch between tracking methods based on project requirements
- Optimise labour productivity reporting and client transparency
Before You Start
Prerequisites:
- Dayworkbook account with Admin permissions (Admin + Billing permissions required for rates)
- Understanding of your workforce structure and typical project requirements
- Knowledge of labour positions used in your construction activities
You'll Need:
- List of standard labour positions (Project Manager, Tradesman, Apprentice, etc.)
- Individual worker names and their assigned positions (for Advanced tracking)
- Standard and overtime hourly rates for each position
- Understanding of your client's documentation requirements
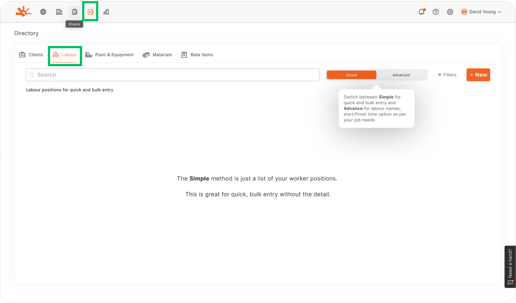
Understanding Simple vs Advanced Labour Tracking
Simple Labour Tracking
Best For:
- Teams where individual worker identity isn't critical
- Large teams where administering ever-changing list of names is not feasible
- Clients who prefer position-based documentation
- Quick daywork sheet creation in field conditions
- Organisations prioritising efficiency over detailed tracking
How It Works:
- Track labour by position only (e.g., "3 Tradesman @ 8 hours each")
- Enter total hours for each position type
- No individual worker names on daywork sheets
- Faster sheet creation and approval process
Advanced Labour Tracking
Best For:
- Detailed productivity analysis and worker accountability
- Compliance requirements needing individual worker documentation
- Projects requiring precise time tracking for each worker
- Organisations wanting comprehensive labour data
How It Works:
- Track individual workers by name within their positions
- Set start/finish times and break durations for each worker (optional)
- Automatic calculation of total hours per worker
- Detailed labour documentation with individual accountability
🎯 Key Point: Choose one method consistently across a Job for standardised reporting and client expectations
⚠️ Watch Out: You can choose between Simple and Advanced for each Sheet
Step-by-Step Instructions
Step 1: Set Up Basic Labour Positions
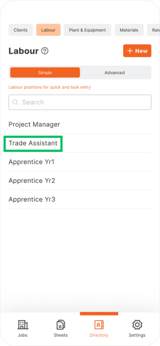
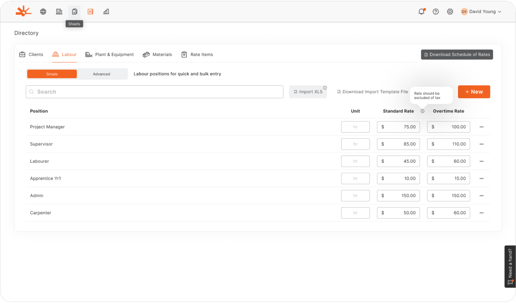
1. Navigate to Directory > Labour tab

2. Click "+ New" to add a labour position

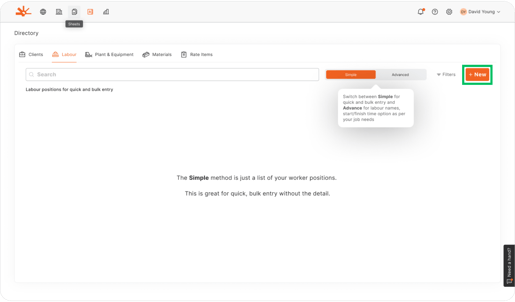
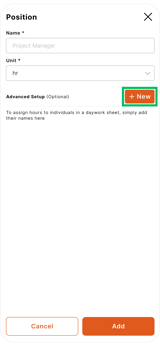
3. Enter position details:
- Position: Clear job title (e.g., "Project Manager", "Tradesman", "Apprentice Yr1")
- Unit: Automatically set to "hr" (hours)
- Standard Rate: Hourly rate for regular time (web only)
- Overtime Rate: Premium rate for overtime hours (web only)


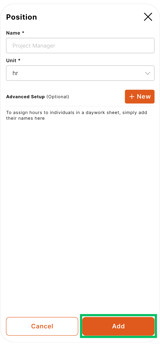
4. Click "Add" to save the position
💡 Pro Tip: Use position names that both your team and clients easily understand and recognise
📱 Mobile Note: Rates can only be configured and viewed on the web application but are viewable on mobile
Step 2: Configure Standard Rate Structure
Set up your standard labour hierarchy:
Common Construction Positions:
- Project Manager: Senior oversight and coordination
- Supervisor: Mid-level management and quality control
- Tradesman: Qualified skilled workers
- Apprentice Yr1/2/3/4: Apprentices by year level
- Labourer: General construction support
- Operator: Specialised equipment operators
Rate Configuration:
1. Add Standard Rate for regular working hours
2. Set Overtime Rate (typically 1.5x or 2x standard rate, organisation-specific)
3. Ensure rates reflect your current pricing structure
4. Consider different rates for different skill levels
⚠️ Watch Out: Rates appear on billing reports, so ensure accuracy for client invoicing
💡 Pro Tip: Use Dayworkbook’s daywork rate calculator to accurately calculate your charge out rates
Step 3: Enable Simple Labour Tracking
For position-based tracking without individual names:
1. Your labour positions are now ready for Simple tracking
2. When creating daywork sheets, select positions from the dropdown
3. Enter the number of workers and hours for each position
4. The system creates documentation like "2 Tradesman @ 8 hours each"
Benefits of Simple Tracking:
- Faster daywork sheet creation
- Less detailed data entry required
- Easier for clients to review and approve
- Suitable for most standard construction work
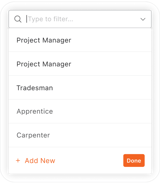
Step 4: Configure Advanced Labour Tracking
For individual worker tracking within positions:
1. Select a labour position from your list
2. Click the position name to open detailed settings
3. Look for "Advanced Setup" or worker management options

4. Click "+ New" to add individual workers:
- Name: Worker's full name as it should appear on sheets
- Position: Assign to the appropriate labour position
5. Click "Add" to save each worker
Advanced Tracking Benefits:
- Individual accountability and productivity tracking
- Detailed time records for each worker
- Enhanced compliance documentation
- Better data for performance analysis
🎯 Key Point: You can have both Simple positions and Advanced positions within the same organisation, and even the same Job
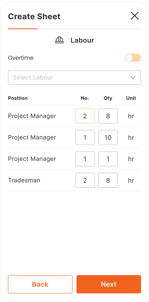
Step 5: Using Simple Labour in Daywork Sheets
When creating daywork sheets with Simple labour:
1. In the Labour section, select your configured positions
2. Enter Number of workers for each position
3. Record Standard Hours and Overtime Hours separately
4. Add position-specific notes if needed
5. The sheet shows: "Position × Number @ Hours = Total Hours"
Example Output:
- 1 Project Manager @ 8 hours = 8 hours
- 3 Tradesman @ 8 hours = 24 hours
- 1 Apprentice Yr2 @ 7 hours = 7 hours

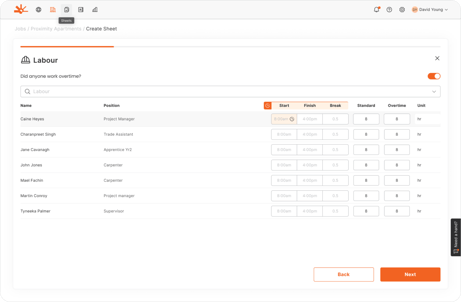
Step 6: Using Advanced Labour in Daywork Sheets
When creating daywork sheets with Advanced labour:
1. Toggle to Advanced mode in the Labour section
2. Select individual workers from your configured list
3. For each worker, set:- Start Time: When they began work
- Finish Time: When they completed work
- Break Duration: Total break time taken
4. The system automatically calculates total working hours
5. Workers are grouped by position on the final sheet

Advanced Features:
- Automatic overtime calculation based on daily hours
- Individual productivity tracking
- Precise time records for compliance
- Detailed labour cost analysis
💡 Pro Tip: Use Advanced tracking for complex projects where individual accountability is important
Step 7: Managing Labour Efficiency and Reporting
Optimise your labour tracking for better insights:
Client Communication:
- Use Simple tracking for clients preferring summary information
- Use Advanced tracking when clients require detailed worker documentation
- Maintain consistency within each client relationship
- Provide additional detail when requested for dispute resolution
🎯 Key Point: Consistent tracking methods improve both internal management and client relationships
Understanding the Results
After configuring your labour tracking approach, you should have:
- Clear position hierarchy reflecting your organisational structure
- Appropriate tracking method chosen based on project and client needs
- Accurate rate structure for professional billing and cost management
- Efficient daywork creation process aligned with field work requirements
- Professional documentation that meets client expectations and compliance needs
Your labour tracking setup now supports both quick field documentation and detailed project analysis.
Troubleshooting Common Issues
Problem: Workers not appearing in Advanced mode
Cause: Individual workers haven't been added to positions or browser cache issues
Solution: Navigate to Directory > Labour, select the position, and add workers using "Advanced Setup". Refresh the page if recently added workers don't appear.
Problem: Can't see or edit labour rates
Cause: Rates are only visible/editable on web application
Solution: Switch to the web version of Dayworkbook to configure all rate information.
Problem: Overtime calculations seem incorrect
Cause: Overtime rate not configured or time entry errors
Solution: Check Directory > Labour to ensure overtime rates are set. In Advanced mode, verify start/finish times are entered correctly.
Problem: Position names not showing consistently
Cause: Spelling variations or duplicate positions created
Solution: Review Directory > Labour for duplicate or similar position names. Standardise position names and remove duplicates.
Problem: Daywork sheets showing wrong labour format
Cause: Mixed use of Simple and Advanced tracking or incorrect mode selection
Solution: Choose consistent tracking method for each project. Check the labour section mode when creating sheets (Simple vs Advanced toggle).
Problem: Client confusion about labour documentation format
Cause: Inconsistent tracking methods or lack of client communication about documentation style
Solution: Discuss preferred documentation format with clients. Maintain consistent approach for each client relationship.
What's Next?
With your labour tracking configured, your next steps are:
- Train your team - Ensure all users understand which tracking method to use
- Configure other resources - Set up Plant & Equipment, Materials, and Rate Items
- Create standardised workflows - Establish consistent processes for different project types
- Monitor productivity - Use labour data to improve project efficiency and profitability
Related Articles
- Setting Up Your Directory (Complete Resource Configuration)
- Creating a Daywork Sheet with Multiple Resource Types
- Managing Plant & Equipment Resources
- Compiling Sheets for Billing with Accurate Labour Costs
Still Need Help?
If this article didn't solve your issue:
- Check Setting Up Your Directory for general resource configuration guidance
- Review Creating a Daywork Sheet to see how labour tracking appears in practice
- Contact support via website or in-app chat
- Contact us via https://dayworkbook.com/contact/